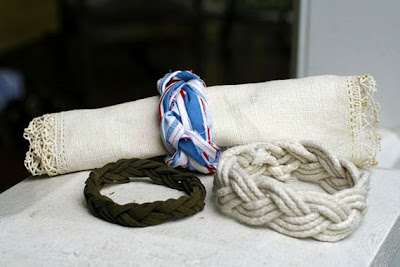
Macrame Lesson Two; A Sailors Knot Bracelet
Here's a unique way to make a Macrame Bracelet! A SAILORS KNOT BRACELET! Turk's head knot From Wikipedia, the free encyclopedia Category Decorative Origin Ancient Typical use Decorative A Turk's head knot is a decorative knot with a variable number of interwoven strands, forming a closed loop. The name is used to describe the general family of all such knots rather than one individual knot. While generally seen made around a cylinder, the knot can also be deformed into a flat, mat-like shape. Some variants can be arranged into a roughly spherical shape, akin to a monkey's fist knot. The knot is used primarily for decoration and occasionally as anti-chafing protection. A notable practical use for the Turk's head is to mark the "king spoke" of a ship's wheel; when this spoke is upright the rudder is in a central position. The knot takes its name from a notional resemblance to a turban (Tr: sarık), though a turban is wound rather than interwoven. The Turk's head knot is used as a woggle by Scout Leaders who completed their training course and were thus awarded with the Wood Badge insignia. Supplies you’ll need: 3.5 yards of twine 14 ounce can for a smaller bracelet or a 20 ounce can for a larger bracelet. Any other round object that has the appropriate circumference for your wrist will do. Directions:
Step 1: Wrap one end of the twine around the can to shape an X. Leave about a 4″ tail. You will need this tail at the end to finish the bracelet.Step 2: Wrap the long end of the twine around the can again and bring it up to the middle of the X. Then pass the long end of the twine under the right, upper leg of the X and pull the long end all the way through.Step 3: Next, move the upper left leg of the X over the right leg of the X to create an oval shape.Step 4: Pull the long end of the twine through the oval shaped opening you just set up. Step 5: Turn the can a bit and you will see that the oval shape has created another X shape. Again, pass the long end of the twine under the right upper leg of the X and pull the end through. Step 6: Repeat steps 3 through 5 until you get to the beginning of your projectStep 7: You will now find a three-stranded braid. Follow the twine you initially laid out and create a parallel second line.Step 8: Continue around the can. If you find that it’s getting too tight to pass the twine through the openings, you may want to take the bracelet off the can and continue with the knotting in your hand. If you take it off, be careful not to pull the twine too tight, otherwise your bracelet will shrink on your wristStep 9: Continue knotting the rope around the bracelet until each strand of the braid has one parallel line — a total of three passes. At this point you can stop or add another three passes to create the traditional pattern of three parallel lines, like the bracelet in the third picture in this step.Step 10: To finish, just knot the ends together and weave them into the inside of the bracelet.Thank you to Simone Tan and The {NewNew} team from Etsy.com for sharing this project with us. Thanks For Visiting!
Step 1: Wrap one end of the twine around the can to shape an X. Leave about a 4″ tail. You will need this tail at the end to finish the bracelet.Step 2: Wrap the long end of the twine around the can again and bring it up to the middle of the X. Then pass the long end of the twine under the right, upper leg of the X and pull the long end all the way through.Step 3: Next, move the upper left leg of the X over the right leg of the X to create an oval shape.Step 4: Pull the long end of the twine through the oval shaped opening you just set up. Step 5: Turn the can a bit and you will see that the oval shape has created another X shape. Again, pass the long end of the twine under the right upper leg of the X and pull the end through. Step 6: Repeat steps 3 through 5 until you get to the beginning of your projectStep 7: You will now find a three-stranded braid. Follow the twine you initially laid out and create a parallel second line.Step 8: Continue around the can. If you find that it’s getting too tight to pass the twine through the openings, you may want to take the bracelet off the can and continue with the knotting in your hand. If you take it off, be careful not to pull the twine too tight, otherwise your bracelet will shrink on your wristStep 9: Continue knotting the rope around the bracelet until each strand of the braid has one parallel line — a total of three passes. At this point you can stop or add another three passes to create the traditional pattern of three parallel lines, like the bracelet in the third picture in this step.Step 10: To finish, just knot the ends together and weave them into the inside of the bracelet.Thank you to Simone Tan and The {NewNew} team from Etsy.com for sharing this project with us. Thanks For Visiting!
Cindy from Craft Flaire
My Etsy Store: www.etsy.com/shop/pom2pomfashions
Follow My Facebook Page


.jpg)
Comments
Post a Comment